Browse Database
The Browse screen displays your participant database in a spreadsheet-style grid. Use it to scan many records at once, sort by any searchable column, locate a participant quickly, or make inline edits without leaving the view.
To open the Browse screen, click the Browse button on the Master Menu.
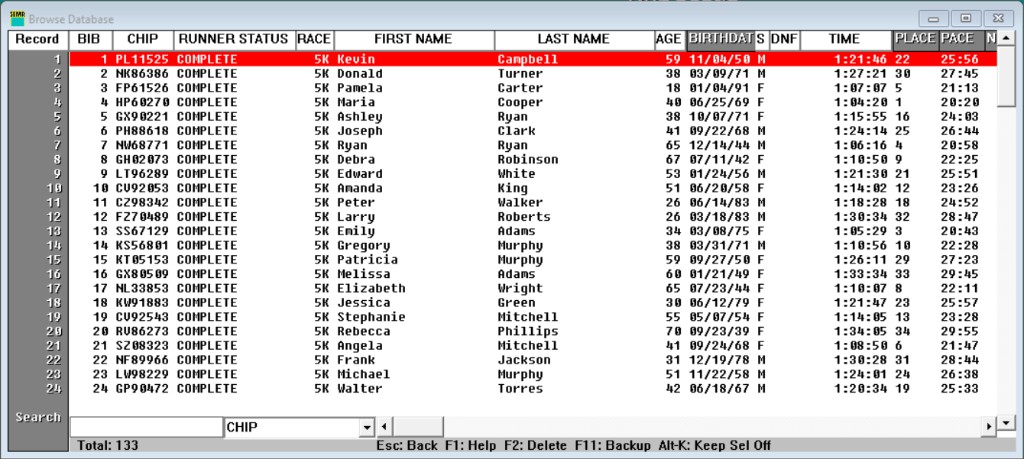
Screen layout
The Browse window is divided into four areas:
- Column headers — clickable buttons across the top. Each searchable field name is a sort button.
- Record grid — rows of participant data. The left margin shows the internal record number. The currently selected row is highlighted.
- Search bar — at the bottom left. A text input (the command line) sits beside a dropdown (the search-field selector).
- Footer legend — a key reference strip along the very bottom edge, with a Total count at its left end.
A vertical scrollbar on the right and a horizontal scrollbar below the grid let you navigate large databases or wide field layouts.
Total counts every record currently loaded into Browse — the same count as Records on the Enter/Edit Names status bar, not Entries. If most records don't have a bib number yet (e.g. a large imported roster), Total can be much higher than the number of participants you'd actually call "entered." See Participant Data for the Entries-vs-Records distinction.
Navigating records
| Key | Action |
|---|---|
Up / Down | Move one row |
PageUp / PageDown | Move one page |
Ctrl+Home | Jump to first record |
Ctrl+End | Jump to last record |
Ctrl+PageUp | Jump to first bib number |
Ctrl+PageDown | Jump to last bib number |
| Mouse wheel | Scroll one row per notch |
Click any row to select it. The record count and the Enter/Edit Names screen (if open) stay in sync with your selection.
Sorting
Click a column header button to sort the database by that field. Click the same header again to reverse the sort direction.
Click the Record button in the top-left corner to return to the default record-number order. Clicking it again reverses that order.
After a sort, the selected row resets to the top of the list by default.
Keep selection on sort
Press Alt+K to toggle Keep Selection. When enabled, the highlighted record stays selected after a sort instead of jumping to the top. The footer legend reflects the current state (Keep Sel On or Keep Sel Off).
Searching
- Choose the field to search on from the dropdown next to the command line. The default is Record (record number).
- Type your search value into the command line and press
Enter.
If the search field is set to Record, type a record number to jump directly to that row. For any other field, type the beginning of the value you are looking for. The highlight moves to the first match after the current position.
Sorting by a column automatically sets the search dropdown to that same field. You can sort a column, then immediately type a value to search within the sorted order.
Editing records
You have three ways to edit a participant from the Browse screen.
Inline editing
- Left-click a row to select it.
- Right-click the same row to open the context menu.
- Choose Edit field from the menu. A small edit box opens inside the grid cell under the cursor.
- Type the new value and press
Enterto save.
After you save, the edit box advances to the next row automatically. Press Down to save and advance, or Up to save and move up. This lets you correct the same field across many records in sequence without reopening the menu.
If the field is marked as unique in your field definitions, RunScore rejects the edit when another record already holds the same value.
Switch to Enter/Edit
- Double-click a row to open that participant in the Enter/Edit Names screen.
- Press
Alt+Eto do the same for the currently highlighted row. - Right-click the selected row and choose Edit entry from the context menu.
If the Enter/Edit Names screen is already open, it jumps to the selected record. If it is not open, RunScore opens it.
Right-click context menu
Right-clicking the currently selected row opens a context menu with four actions:
| Menu item | Equivalent key |
|---|---|
| Edit field | (starts inline edit) |
| Edit entry | Alt+E |
| Delete entry | F2 |
| Keep selection on sort | Alt+K |
Right-clicking a row that is not already selected has no effect. Left-click first to select, then right-click.
Deleting records
Press F2 to delete the highlighted record.
By default, RunScore shows a confirmation prompt before deleting. To skip the prompt, press Ctrl+F2 first. This arms the delete function — the status bar displays "Delete armed" and subsequent F2 presses delete immediately with no confirmation.
Press Ctrl+F2 again to disarm and restore the confirmation prompt.
Deleting a record is immediate and permanent. There is no undo. Consider backing up your database with F11 before bulk deletions.
Backing up your database (F11)
Press F11 to copy your participant database files to a backup folder. This is a quick safeguard you can run at any time while reviewing data.
What gets backed up
RunScore copies two files to the backup destination:
| File | Contents |
|---|---|
.dta | The participant data file |
.frm | The format file RunScore uses to open the database |
Backup destination
The files are saved to the folder configured in Preferences → Alternative folder to save entries. The filenames match your database base name (typically ENTRIES).
Messages
| Outcome | Message |
|---|---|
| Success | "Database backup complete." |
| Folder not configured | "Backup folder is not configured. Set it in Preferences → Alternative folder to save entries." |
| Copy failed | An error message listing the file paths that failed. |
Set the backup folder to a USB drive or network share so you always have an off-machine copy of your registrant data during an event.
Printing
Select File → Print from the menu bar to print the current Browse view. A standard Windows print dialog opens, letting you select a printer and page range before sending the grid to paper.
Swapping participant data between bibs
Use the @swap command to move participant data from one bib to another. The command keeps a set number of leading fields in their original records and moves every remaining field to the opposite record.
Syntax
@swap BIB1 BIB2 [n]
| Argument | Required | Description |
|---|---|---|
BIB1 | Yes | First bib number. |
BIB2 | Yes | Second bib number. |
n | No | How many leading data fields to keep in place. Default is 1 (the bib field only). |
How to swap two participants
- Open the Browse screen.
- Click the command line at the bottom of the window.
- Type
@swapfollowed by the two bib numbers. For example:@swap 101 202 - Press
Enter.
RunScore locates both records, exchanges the data, and updates the search index. If either bib number is not found, RunScore displays "Bib number nnn not found" and makes no changes.

What stays and what moves
When you omit n (or set it to 1), only the bib field stays in its original record. Every other field — chip code, times, name, age, and so on — moves to the opposite record.
When you supply a larger n, RunScore counts that many data fields forward from the bib in your form's field order and keeps all of them in place. Only the fields after that point move.
Example — default swap
Suppose your database contains two records with the field order shown below.
Before @swap 101 202:
| Field | Bib 101 | Bib 202 |
|---|---|---|
| Bib | 101 | 202 |
| Chip | A1B2C3 | D4E5F6 |
| Net Time | 25:30.45 | 31:12.08 |
| Last Name | Martinez | Okafor |
| First Name | Elena | David |
| Age | 29 | 34 |
| Gender | F | M |
After @swap 101 202:
| Field | Bib 101 | Bib 202 |
|---|---|---|
| Bib | 101 (stayed) | 202 (stayed) |
| Chip | D4E5F6 | A1B2C3 |
| Net Time | 31:12.08 | 25:30.45 |
| Last Name | Okafor | Martinez |
| First Name | David | Elena |
| Age | 34 | 29 |
| Gender | M | F |
The bib numbers stayed in their original slots. Every other field moved to the opposite record.
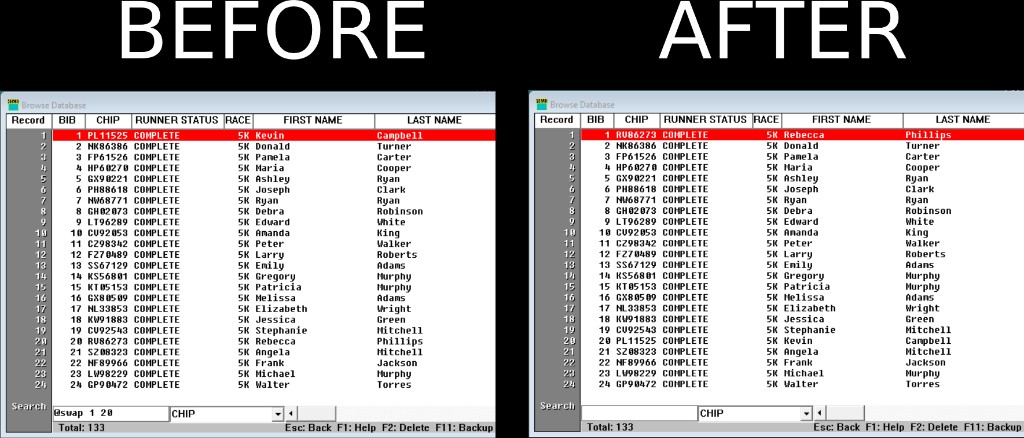
Example — keeping timing fields in place
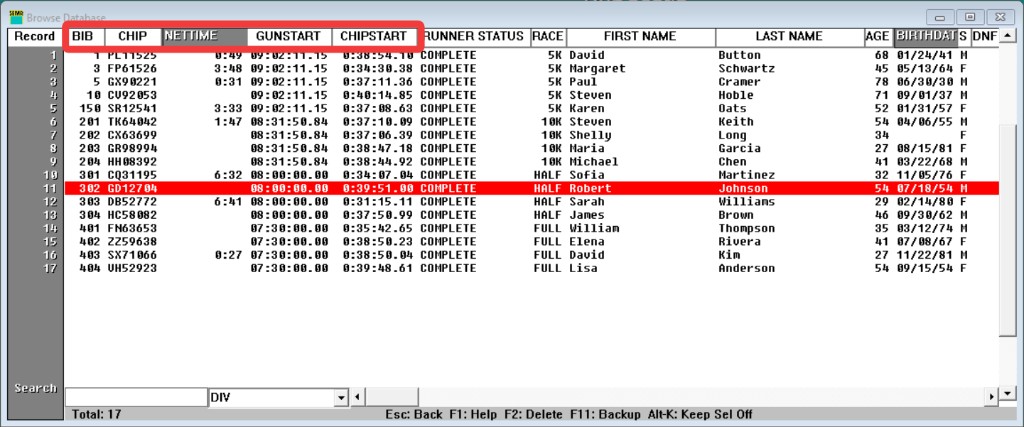
If your form order is Bib → Chip → Net Time → Gun Time → …, running @swap 101 202 4 keeps the first four data fields (Bib, Chip, Net Time, Gun Time) in place. Only the fields after Gun Time move to the opposite record.
Most swaps happen because two runners physically swapped bibs — the chip travels with the bib, so the chip and recorded times at each bib slot are already correct; only the runner's identity fields need to move.
Place the chip field (Chip) and any Event to Database timing fields (Net Time, Gun Time, Chip Start) immediately after the bib. A form ordered as Bib → Chip → Net Time → Gun Time → Chip Start → personal fields lets you run @swap 101 202 5 to move only personal information while keeping the bib, chip assignment, and recorded times in place. Derived fields such as Place or Pace can be recomputed with another Event to Database run after the swap.
Key reference
| Key | Action |
|---|---|
Esc | Close the Browse screen |
Enter | Submit a search, or save an inline edit and advance to the next row |
F1 | Open help for this screen |
F2 | Delete the highlighted record |
Ctrl+F2 | Arm / disarm delete (skip confirmation) |
F11 | Back up the database to the configured folder |
Alt+E | Open the highlighted record in Enter/Edit Names |
Alt+K | Toggle keep-selection-on-sort |
With your participant data reviewed, you're ready to start capturing finish times. Head to Race Results.